What's new here?

Archive for December, 2013

REPOST: So you got a new telescope for the holidays – A Quick Primer for new telescope users.

Be it X-mas, Hannukah, Kwanza, Solstice or Giftmas this is the season for getting telescopes as gifts. Sadly, many of these scopes might be rushed into usage and some critical steps might be 016
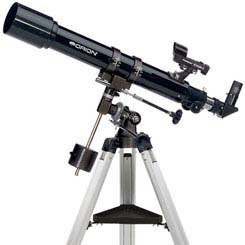
skipped. This can result in a frustrating experience for a budding young astronomer who may give up their new hobby prematurely. This can be avoided if you only take the time and a few precautions to make certain you get the baby steps out of the way without too much tripping and falling.

1) Do as much as you can during daytime first!

I can’t stress this too much. Many folks assume they can assemble their telescope right out of the box at their chosen viewing spot – in the dark. Suffice it to say this is not a good idea. Assembling out of the box at the viewing site might be an extreme example but you should certainly try working your scope and getting the ‘feel’ for it during the daytime as much as possible. Take your telescope outside during the daytime and point it at a nearby tree or other object (the object should be at least 1/4 mile away). Use this object to align the finder scope (see below) as well as test how the eyepiece focuses. Try changing your eyepieces between the low and high powered ones to see how that works as well. Move the telescope in large movements as well as using the slow motion controls as well. When you do these things in the daylight you can get a much better feel for how they should work than if you try them at night. Also if you drop an eyepiece or loosen a screw you have a decent chance to find it. Get your mistakes out of the way when the sun is up.

2) Assemble your telescope properly

This should go without saying, but it is amazing how many folks skip a few steps or don’t attach parts, or don’t read the instructions properly. We’ve seen telescopes in for “repairs” just after the holidays that were just put together wrong, or some critical final steps were ignored (slow motion controls not attached, counterweights not placed). Most of the time, there are very few non-critical elements of a telescope’s construction. So be sure to follow the assembly procedure carefully. Allow yourself a couple of hours as well (maybe three hours for certain models of dobsonian telescopes) for the assembly. Don’t assume you can just put it together a 1/2 hour before you plan to head out and view.

3) Align your finder scope. Align your finder scope! ALIGN YOUR FINDER SCOPE!

Get the point? Many folks ignore this step until the last minute and we can tell you that trying to work a telescope without an aligned finger is very,very, very hard. Even the lower 084magnifications on a short focal length telescope only see a little under 1 arc degree of the sky. This is a tiny portion of the sky so hoping to find an object with just the eyepiece is really hard to do. There is a reason why almost all telescopes come with a finder scope. So make sure to align it (During the daytime per suggestion #1) . If your telescope comes with a red-dot finder instead of an optical finder scope, be certain to carefully align that as well during the daytime – and don’t forget to switch it off! A dead battery in a red dot finder is nobody’s friend.

4) Did you get an Equatorial mount? Figure out how it moves!

An equatorial mount has some great advantages over a regular altazimuth (altitude-azimuth) mount. It can track, be motorized, and the larger ones can even be used with setting circles to locate objects in the night sky. But these are only true if you take advantage of the equatorial mount’s features and set it up properly. During the daytime (suggestion #1 again!) try a rudimentary set-up of the equatorial mount. This does not have to be super accurate as some telescope’s instruction manuals may require, just enough to get mostly accurate tracking for a little while. Perhaps more importantly, get a feel for how the telescope moves – you are used to moving things in an up/down left/right fashion. Now you need to get used to moving the telescope in declination and right ascension. Try moving the telescope from one target to another using the mount properly during the daytime to get a better sense of it. One thing to keep in mind is that the counterweight is there for a reason – it shouldn’t be pointing down all the time.

5) Choose your first targets wisely!

Many folks go out with their telescope and just point it at the brightest thing in the sky. This is fine if the brightest object is a planet or the Moon, as there is lots to see. But very often at this time of year the planets might not be out until very late and the brightest thing in the sky is the star Sirius. Problem is, Sirius is just a star and stars appear as just a point of light even when magnified through your telescope. This can be a very boring target and can be disappointing if it is the only bright object. So make certain before you go out for your first night’s viewing that you know what will be up! Most telescopes these days come with some rudimentary planetarium software that can show you what the sky will be like on any night. Failing that there are online websites that do the same thing (sometimes better). Planispheres can also be used, and if you have a Smartphone or pad you should download a planetarium app like Google Sky (its free). Depending on what time of the month it is, the Moon may not be up during evening hours. Since we suggest the Moon as a great first target for your telescope you might want to wait for it. Failing that, try to look for the brighter planets.

6) Got a computerized telescope? You might want to ignore it -at first.

And by that we mean the computer, not the telescope. Some models of computerized telescope don’t allow you to operate the telescope without the computer, but if you can try to figure out as much as you can without computer aid before you even start using it. Computers often make many things in our lives easier, but they can also frustrate you -a lot. Most computerized telescopes may require you to have at least some knowledge of the night sky to set up the alignment system (the telescope usually needs to be aimed at a couple of stars to align). This can mean that if you don’t know what stars to point at or if the system is a bit off because a tripod leg is set short than another you can spend a lot of time trying to get the computer to act properly and get frustrated. So rather than doing that spend some time getting familiar with the night sky first by using your scope on bright, easy-to-find objects.

7) Learn, learn learn!

There’s a host of information for astronomy newbies on the internet and in books. Amateur astronomers are very keen on sharing their knowledge and experience with you. Check out the major magazines online websites such as Sky & Telescope or Astronomy. There are a zillion astronomy websites with forums as well you might wish to peruse. Even on this blog we have a collection of Telescope Tips you should check out for helpful advice. Also consider joining or at least contacting your local astronomy club – you can find all kinds of help from them, as well as many other benefits from membership (such as loaner equipment).

If your first night with your telescope is a good one, then you’ll have a much better time with the hobby. But always remember a little planning goes a long way!

Happy New Year!

Interested in buying telescopes?

www.spectrum-scientifics.com

Gift Ideas for older kids (sometimes known as ‘adults’)

Sometimes you just want to get a friend, spouse, sibling, parent or somebody who isn’t a child a neat present from your science store.  Well here are a few suggestions for items that adults can enjoy.

Rare Earth Magnet Building Toy

4894

(more…)

REPOST: The Spectrum Scientifics Telescope Buyer’s Guide

Reposting this for the holidays!

Spectrum Scientifics Telescope Buyers Guide

There are several telescope buyers guides available on the Internet, some good, some not so good. At Spectrum we are writing from our experience with customers and hope to make this simple and helpful.

Towards that end, the first and in some ways only rule of telescopes is:

Aperture is King!

Aperture is the diameter of the main lens or mirror of the telescope. The bigger it is, the more light the telescope gathers. Do not judge a telescope by its magnification, and stay away from any brand of telescope that sells itself on excess magnification claims (300x!, 600x!, etc.). This is sure sign of poor quality.

More light gathering means better, brighter images, assuming all other things being equal. Decent commercially sold telescopes usually start about 60mm in size (about 2.3”) and go to 20” diameter or more. Roughly speaking, every 2 extra inches of aperture doubles the light gathering capacity of the telescope.

The big problem with getting more aperture is that it increases the size and weight of the telescope. Having a huge, giant telescope with lots of light gathering power has little benefit if it is so heavy you never want to take it out and use it! A minor, but critical caveat to the ‘Aperture is King’ rule is that the small, portable telescope that gets used all the time is more powerful than the giant telescope that never gets moved out of the garage.

What Kind of Telescope?

There are three types of telescope: Reflector, Refractor, and Cassegrain. For beginners purposes, only the first two should be seriously considered. Cassegrain telescope are very nice, but are a bit advanced for first time scope buyers.

Reflector telescopes use parabolic or spherical curved mirrors to gather and concentrate light. The advantage of reflector telescopes is that they are the most economical for larger sizes. The disadvantages are: in inverted image (meaning a reflector telescope cannot be used for looking down the street) and a need for occasional maintenance: the mirror must occasionally be aligned, or collimated to ensure the telescope is working at its best.

Refractor telescopes use two or more lenses to gather and bend (or refract) light. The advantage for refractors is that, at equal sizes, they provide a more crisp image of the object being view versus a reflector telescope, refractors also can be used for terrestrial viewing (i.e. Looking down the street again), and they do not need to be collimated like reflector telescopes. The disadvantages to refractor telescopes is that as refractor telescopes get larger, they increase in price at a much faster rate than reflectors. At smaller sizes, say 2-3” in diameter, the prices are roughly equal for reflectors and refractors. But by the time you reach a 5” aperture, the price of the refractor will be at least double that of the reflector.

Due to the difficulty of grinding larger lenses, the weight of those lenses, and an optical effect called chromatic aberration (where the light is broken up as it travels through the refractors lens in a manner similar to prisms) refractors generally are not made larger than 5-6” in diameter.

What Kind of Mount?

Any telescope is going to need a mount! There are three different mount designs to consider: altazimuth, equatorial, and dobsonian. Whatever mount you decide on, it should be strong enough to hold the optical tube without wobbling. Nothing is more annoying than trying to view an object in the sky, only to have it bounce around and be unwatchable because of a poor mount.

Altazimuth Mounts:Altazimuth mounts are simple mounts designed to help aim the telescope in simple up/down (altitude) and left/right (azimuth). Altazimuth mounts are simple and intuitive, and work well for beginners. They are also useful if you wish to use your telescope for terrestrial viewing. The problem with altazimuth mounts is this: objects in the sky do not move in convenient up/down, left/right motion. They move through the sky in an arc (or at least it seems that way to us!). This means that trying to track celestial objects using an altazimuth mount can be like drawing a curve with an etch-a-sketch! For most beginner viewing, this is not an issue, and one can always reacquire an object that moves out of the field of view. But it does mean that if you find a nice object with your telescope, and leave to go let your friends know, it will likely move out of the eyepiece view by the time you come back!

Equatorial Mounts: Sometimes called German equatorial mounts, are distinguished by their counterweights that are needed to keep the telescope properly balanced. Equatorial mounts require more setup than altazimuth mounts as they must be adjusted to your latitude and aimed North. They are also not as intuitive to aim as altazimuth mounts as they do not follow left/right up/down motions but instead move along declination and right ascension. This follows the path of stars, planets, and deep space objects, but takes some getting used to. The advantages of equatorial mounts are that they can track objects with a turn of a knob, or they can even be motorized. The other advantage is that with some study, the equatorial mount’s setting circles can be used to actually find objects in the night sky! Equatorial mounts are also required for any type of astrophotography, but for beginners this should not be a great concern.

Dobsonian Mounts: Some consider the Dobsonian to be just variant of the altazimuth mount, and they are not completely wrong. Dobsonians have the same advantages and disadvantages of altazimuth mounts: intuitive movement, no tracking, etc. But the difference is that a Dobsonian mount uses a lazy-susan style platform to move in azimuth and usually some form of hubs to move in altitude. The result is that a Dobsonian mount can handle much, much heavier optical tubes than most altazimuth tripod mounts are capable of handling. Thanks to several improvements in design, Dobsonian mounts have become more and more popular as they are one of the most economical telescope designs on the market today.

Other Considerations:

The optical tube and mount are major concerns, but they are not the only things one should consider when buying a telescope:

Eyepieces: Eyepieces are often overlooked when buying a telescope, but they should be considered seriously by the beginner as they are 50% of the overall optical system. Almost all telescopes include 2 eyepieces, but by no means are all eyepieces created equal. Cheap telescopes usually include old, cheap eyepiece designs such as Ramsden or Huygenian designs that actually can make the image worse. The telescope you buy should come with eyepieces that, at a minimum, are Kellner or preferably Plossl design. These eyepiece designs are considered the standard for decent eyepieces.

Finder Scope: Every telescope needs a finder scope, a small telescope that sits on top of your main optical tube and aids in aiming the telescope. Most lower end telescopes these days use a reflex finder which projects a red dot onto an optical window to show where the telescope is pointing. These reflex finders are actually easier to use than a cheap finder scope would be. However, for larger telescopes a 6×30 (which stands for: 6 magnification, 30mm aperture) finder scope is much more appropriate. Larger telescopes may also have even larger finder scopes. Avoid telescopes with old 5x finder scopes, or at least be willing to try and attach some sort of reflex finder in its place.

Optional Accessories: Not everything you need for observing the night sky will come with your telescope (and if it does, beware, some companies gussy up cheap scopes with cheap accessories!). There are some things that should be in any astronomer’s ‘kit’. Such as:

  • A Planisphere

Make certain this is one you can read easily at night with your red flashlight!

  • A Red Light Flashlight :

A red flashlight prevents you from losing your night vision the way a regular (white) flashlight would.

  • A Barlow Lens

A Barlow lens is a lens you slip your eyepieces into that then doubles or triples their magnification. Having a barlow is like doubling the number of eyepieces you have. Make sure you have a barlow before you go buying additional eyepieces.

  • A decent Astronomy book

Don’t just buy a book with pretty pictures. Make certain it is a useful book that gives helpful instructions and advice on how to use your telescope, find& observe night-sky objects and other hints. Make certain to read it fully before you go observing, then refer to it during your observation session.

  • Time and good weather

Make certain that you have time for your new hobby. It takes some commitment for even casual viewing. Also, make certain that before you go observing that the weather is decent for viewing. There’s no point in going observing on a night where haze clouds everything in view!

  • Warm clothing

OK, you should really have this stuff already. But it is important to know. Even in warm summer months the temperature can get surprisingly cool at night. Be certain that you are ready for the weather, wherever you are and whenever you observe.

Other accessories you should consider, but are not as crucial as the above items are:

  • FiltersThere are a lot of filters available, and they all help with viewing certain objects. Moon filters cut down on the bright moon (which can actually be painful to view through a large telescope!). Color filters help bring out features of the planets. Sky Pollution filters reduce (but do not eliminate) the effects of light pollution. Read up on their effects and decide if any of these filters are right for your needs.
  • A Carrying Case (for accessories)Eyepieces, barlows, filters, books, & planispheres! All these little parts can be hard to carry and just shoving them into a bag isn’t a very good idea. Consider buying an accessory case to put your eyepieces, etc in for easy transportation. The time to consider getting a carrying case is when moving the accessories is starting to get in the way of your night sky enjoyment.
  • Binoculars!
  • If you haven’t already gotten a full sized pair, you should. Binoculars make for easy viewing, help find night sky objects. And are great for quick viewing. These need not be specifically astronomy binoculars, just a decent pair of full-sized binoculars will work fine.

Things Not To Worry About

There is plenty to consider when buying your first telescope, but some things should not be worried about. These include:

Astrophotography:

Astrophotography, even in the age of digital cameras, is pretty advanced stuff that requires a lot of time and equipment. Trying to jump into it, or making your telescope buying decisions based on it, is like learning to swim by jumping into a the deep end of the pool. First make certain that you enjoy astronomy, and can commit the time for basic viewing before you even consider taking up astrophotography. Remember that if you need a different mount than what you initially buy as your first telescope that you can usually sell the old telescope at a reasonable price.

Ultra-High End GPS Super GoTo Computer Guidance Systems:

These systems, while great, can actually be problematic. They are expensive, aren’t the ‘idiot-proof’ systems some folks make them out to be, they limit you from learning about the night sky, and many designs actually require that you aim with the computer. This means if the computer’s motors run out of battery power, you can’t even aim the telescope yourself! Basic guidance systems, such as the Orion Intelliscope line are useful for finding objects in the night sky without taking the experience away from you! Consider these instead of completely controlled systems.

Color!

If one were to look through a book of astronomy picture you would think that every view of the night sky through a telescope is awash in bright, pretty colors. Sadly, this is not the case. Most of these photos are taken with long exposure photography and show colors that, while there, are not apparent to the human eye. Be realistic about what you see, and make certain that the telescope you buy doesn’t have tons of unrealistic photos on its box (which were usually taken by the Hubble Space Telescope or the Viking and Voyager probes!).

Above all else BE READY TO ASK QUESTIONS!  Ask your local salesman, ask for advice online. Don’t be shy! Amateur astronomers may be opinionated but they are more than happy to share their experiences and expertise with you!

Want to buy telescopes?

www.spectrum-scientifics.com

Quick Pick Gifts Under $15!

OK, let’s just talk about low-cost gifts for a few minutes.  Here is list of gifts that are under $15 (or even lower cost) that make excellent gifts for people.

Brain Cell Giant Microbe ($8.95)

894

What a great way to say ‘Get a brain!’ without being insulting….mostly.

(more…)