Updated Repost: So you got a new telescope for the holidays – A Quick Primer for new telescope users.
This is an updated repost of our popular new telescope owner Primer. We’ve added a few bits concnering new attitudes on computerized telescopes and a few other minor tweaks. Be sure ot pay attention when you first use your telescope. Locally, most folks probably haven’t since I don’t think we’ve had a clear night since the 25th. Anyway, read-on and learn!
So you got a new telescope for the holidays: A Quick Primer for new telescope users.
Be it X-mas, Hannukah, Kwanza, Solstice or Giftmas this is the season for getting telescopes as gifts. Sadly, many of these scopes might be rushed into usage and some critical steps might be  skipped. This can result in a frustrating experience for a budding young astronomer who may give up their new hobby prematurely. This can be avoided if you only take the time and a few precautions to make certain you get the baby steps out of the way without too much tripping and falling.
1) Do as much as you can during daytime first!
I can’t stress this too much. Many folks assume they can assemble their telescope right out of the box at their chosen viewing spot – in the dark. Suffice it to say this is not a good idea. Assembling out of the box at the viewing site might be an extreme example but you should certainly try working your scope and getting the ‘feel’ for it during the daytime as much as possible. Take your telescope outside during the daytime and point it at a nearby tree or other object (the object should be at least 1/4 mile away). Use this object to align the finder scope (see below) as well as test how the eyepiece focuses. Try changing your eyepieces between the low and high powered ones to see how that works as well. Move the telescope in large movements as well as using the slow motion controls as well. When you do these things in the daylight you can get a much better feel for how they should work than if you try them at night. Also if you drop an eyepiece or loosen a screw you have a decent chance to find it. Get your mistakes out of the way when the sun is up.
2) Assemble your telescope properly
This should go without saying, but it is amazing how many folks skip a few steps or don’t attach parts, or don’t read the instructions properly. We’ve seen telescopes in for “repairs” just after the holidays that were just put together wrong, or some critical final steps were ignored (slow motion controls not attached, counterweights not placed). Most of the time, there are very few non-critical elements of a telescope’s construction. So be sure to follow the assembly procedure carefully. Allow yourself a couple of hours as well (maybe three hours for certain models of dobsonian telescopes) for the assembly. Don’t assume you can just put it together a 1/2 hour before you plan to head out and view.
3) Align your finder scope. Align your finder scope! ALIGN YOUR FINDER SCOPE!
Get the point? Many folks ignore this step until the last minute and we can tell you that trying to work a telescope without an aligned finger is very,very, very hard. Even the lower  magnifications on a short focal length telescope only see a little under 1 arc degree of the sky. This is a tiny portion of the sky so hoping to find an object with just the eyepiece is really hard to do. There is a reason why almost all telescopes come with a finder scope. So make sure to align it (During the daytime per suggestion #1) . If your telescope comes with a red-dot finder instead of an optical finder scope, be certain to carefully align that as well during the daytime – and don’t forget to switch it off! A dead battery in a red dot finder is nobody’s friend.
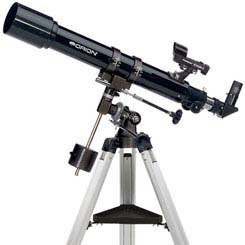
4) Did you get an Equatorial mount? Figure out how it moves!
An equatorial mount has some great advantages over a regular altazimuth (altitude-azimuth) mount. It can track, be motorized, and the larger ones can even be used with setting circles to locate objects in the night sky. But these are only true if you take advantage of the equatorial mount’s features and set it up properly. During the daytime (suggestion #1 again!) try a rudimentary set-up of the equatorial mount. This does not have to be super accurate as some telescope’s instruction manuals may require, just enough to get mostly accurate tracking for a little while. Perhaps more importantly, get a feel for how the telescope moves – you are used to moving things in an up/down left/right fashion. Now you need to get used to moving the telescope in declination and right ascension. Try moving the telescope from one target to another using the mount properly during the daytime to get a better sense of it. One thing to keep in mind is that the counterweight is there for a reason – it shouldn’t be pointing down all the time.
If you have a larger Equatorial mount keep in mind that you can use the setting circles to help find objects in the night sky with the help of a star atlas. But this means you have to learn to use it. Read your instruction manual carefully. You might also consider downloading a Sidereal Time app for you smartphone. You’ll see why once you figure out the details of using your Equatorial mount.
5) Choose your first targets wisely!
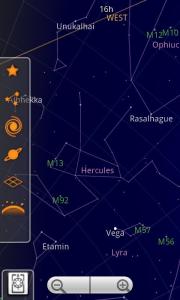
Many folks go out with their telescope and just point it at the brightest thing in the sky. This is fine if the brightest object is a planet or the Moon, as there is lots to see. But very often at this time of year the planets might not be out until very late and the brightest thing in the sky is the star Sirius. Problem is, Sirius is just a star and stars appear as just a point of light even when magnified through your telescope. This can be a very boring target and can be disappointing if it is the only bright object. So make certain before you go out for your first night’s viewing that you know what will be up! Most telescopes these days come with some rudimentary planetarium software that can show you what the sky will be like on any night. Failing that there are online websites that do the same thing (sometimes better). Planispheres can also be used, and if you have a Smartphone or pad you should download a planetarium app like Google Sky (its free). Depending on what time of the month it is, the Moon may not be up during evening hours. Since we suggest the Moon as a great first target for your telescope you might want to wait for it. Failing that, try to look for the brighter planets.
6) Got a computerized telescope? Take advantage of free smartphone apps to make it much easier to set up!
We’ve been kind of ‘meh’ about computerized telescopes in the past, and are still a bit wary of a telescope where 70% of the cost is in the computer and motors and not the optics. But we have softened a bit since they have become a bit easier to use – and not because they changed, but rather our phones did.
Computerized telescope makers kind of make it seem like a computer means your telescope will magically find things in the night sky. All you need to do is toss it into your yard and enjoy the viewing. But that is not how they work. To set up the telescope’s computer you need to point it at two named stars so it can calculate where everything else in the night sky is located. This used to mean that to set up the telescope you had to have good knowledge of the night sky to find those stars -which kind of defeated the purpose.
But now smartphones are ubiquitous these days and there are plenty of planetarium apps out there for free that will help you identify those stars. Smartphone planetarium apps are not super-accurate (they can be off by as much as an hour) but they will help you spot and identify bright stars that you need to aim your telescope at to orient the computer. This makes the computer orientation much easier to do than trying to learn to use a planisphere or star map on the fly.
7) Learn, learn learn!
There’s a host of information for astronomy newbies on the internet and in books. Amateur astronomers are very keen on sharing their knowledge and experience with you. Check out the major magazines online websites such as Sky & Telescope or Astronomy. There are a zillion astronomy websites with forums as well you might wish to peruse. Even on this blog we have a collection of Telescope Tips you should check out for helpful advice. Also consider joining or at least contacting your local astronomy club – you can find all kinds of help from them, as well as many other benefits from membership (such as loaner equipment).
If your first night with your telescope is a good one, then you’ll have a much better time with the hobby. But always remember a little planning goes a long way!
Happy New Year!
Interested in buying telescopes?